
Deploying Bitlocker Drive Encryption Domain-Wide

You should definitely be using encryption wherever possible. That includes encrypting data at-rest. If you are an organization using Active Directory and any number of Windows client machines, you're going to want to make sure that if those devices are lost or stolen, the data on them is safe. Probably the best option is BitLocker.
BitLocker is an encryption scheme built-in to Windows, that allows you to quietly encrypt an entire boot drive in the background (either using the drive's built-in encryption mechanism or using software), and store the recovery key in Active Directory. It's completely free, and only requires a Powershell command on each workstation and a GPO.
First, let's lay out our goals:
- Every Workstations's C:\ drive is encrypted automatically in the background.
- If the drive has built-in encryption capability use that (to save resources), otherwise have Windows do the encryption/decryption in software.
- Save the recovery password to Active directory.
- Don't require the user to enter a PIN or anything (seamless)
- Don't encrypt unless the password can be saved (so we don't get locked out.)
- Don't allow users to change settings.
- Don't allow any other kinds of recovery (Keyfile, certificate, etc.)
Let's get into it.
First off, Bitlocker requires the use of a TPM (Trusted Platform Module). Not only must your computer include one, but it must be enabled in UEFI/BIOS. The vast majority of computers out there currently do have a TPM (In fact you can't even run Windows 11 without one, unless you resort to unofficial workarounds.) and they're pretty much always enabled by default. This is unlikely to be an issue for most, but it's worth mentioning.
Check your Schema
Depending on your version of Active Directory, you may not have the appropriate attributes to store Bitlocker info. Log into your Domain Controller, open Powershell and run the following command:
Get-ADObject -SearchBase ((GET-ADRootDSE).SchemaNamingContext) -Filter {Name -like 'ms-FVE-*'}
You should see an output similar to the image below. These are the 5 attributes we expect to see.

If you don't see the expected output...
...which can happen if your forest was originally established on an older version of Windows and later upgraded, then you'll want to run the command below. Obviously change the example and com portions to match your domain, but make sure to leave DC=X as well as the trailing period.
ldifde -i -v -f BitLockerTPMSchemaExtension.ldf -c "DC=X" "DC=example,DC=com" -k -j .
Example output when successful looks something like this:
"DC=black,DC=nttest,dc=corp,dc=microsoft,dc=com" -k -j .
Connecting to "x-hp-test-serve.black.nttest.corp.microsoft.com"
Logging in as current user using SSPI
Importing directory from file "RC1BitLockerTPMSchemaExtension.ldf"
Loading entries
1: CN=ms-TPM-OwnerInformation,CN=Schema,CN=Configuration,DC=black,DC=nttest,dc=corp,dc=microsoft,dc=com
Entry modified successfully.
2: CN=ms-FVE-RecoveryGuid,CN=Schema,CN=Configuration,DC=black,DC=nttest,dc=corp,dc=microsoft,dc=com
Entry modified successfully.
3: CN=ms-FVE-RecoveryPassword,CN=Schema,CN=Configuration,DC=black,DC=nttest,dc=corp,dc=microsoft,dc=com
Entry modified successfully.

...

20: CN=ms-TPM-OwnerInformation,CN=Schema,CN=Configuration,DC=black,DC=nttest,dc=corp,dc=microsoft,dc=com
Entry modified successfully.
20 entries modified successfully.
The command has completed successfully
Create the GPO
First we need a bit of group policy to make sure that when our workstations run the command to begin encrypting themselves, they do it the correct way. We'll need to open up Group Policy Management Editor, create a new GPO, then navigate to Computer Configuration > Policies > Administrative Templates > Windows Components > Bitlocker Drive Encryption > Operating System Drives

We have a few options here, so I will run over each real quick:
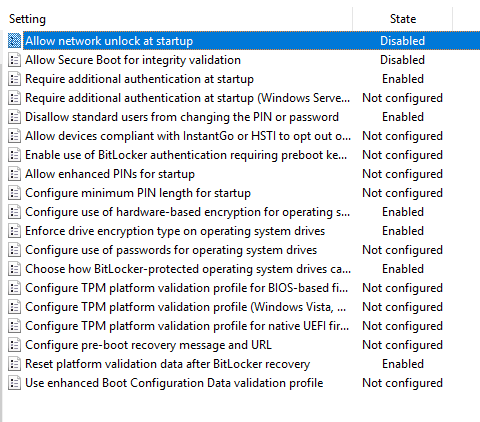
- Allow Network Unlock at Startup: Technically you can set up a Bitlocker Drive Encryption Network unlock server and allow workstations to unlock themselves over the LAN. We do not use this.
- Allow Secure Boot for integrity validation: Because we use FOG Server to reimage Windows machines, we have to turn of Secure boot (which is fine, as it doesn't really make things more secure.) This option makes it so Bitlocker doesn't care about Secure Boot.
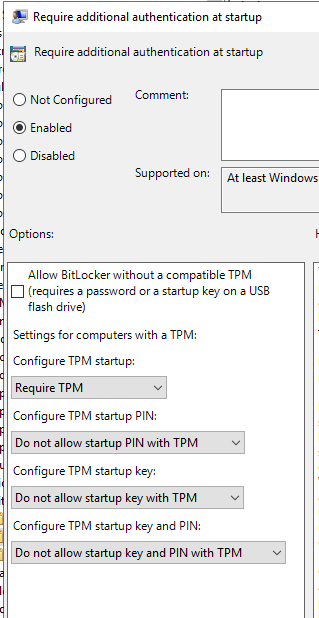
- Require additional authentication at startup: We have this enabled, and set to only use the TPM for verification, so that the user does not have to enter a PIN or insert a flash drive. See image below:
- Disallow standard users from changing the PIN or password: This seems obvious, since we don't want anyone using a PIN or password at all.
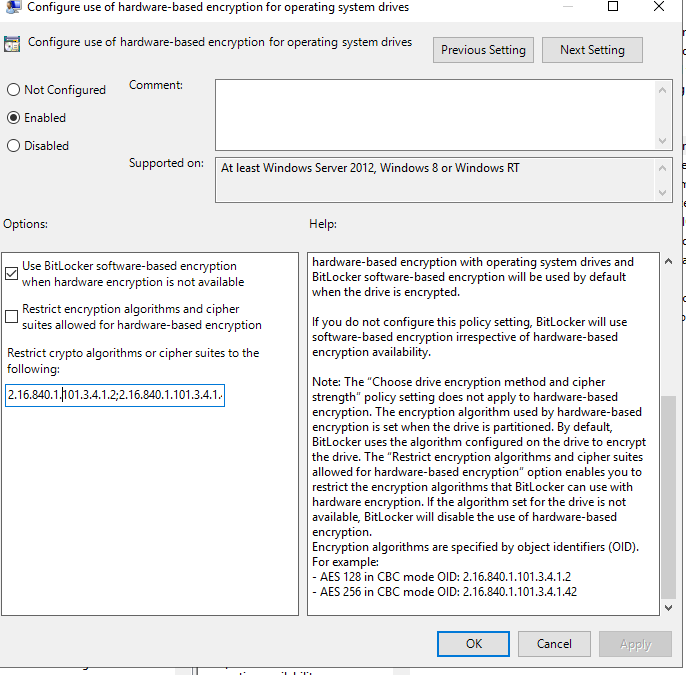
- Configure use of hardware-based encryption for operating system drives: This we will set to use the encryption mechanisms built-in to the drive if present (which will save on resources) but fallback to software if needed. We don't restrict algorithms as most of our machines are newer and this is unlikely to cause issues, but you can specify if it makes sense for your threat model. See image below:
- Enforce drive encryption type on operating system drives: We want to enable this and set it to Full Encryption. Other options are only encrypting user files, and allowing the user to choose.
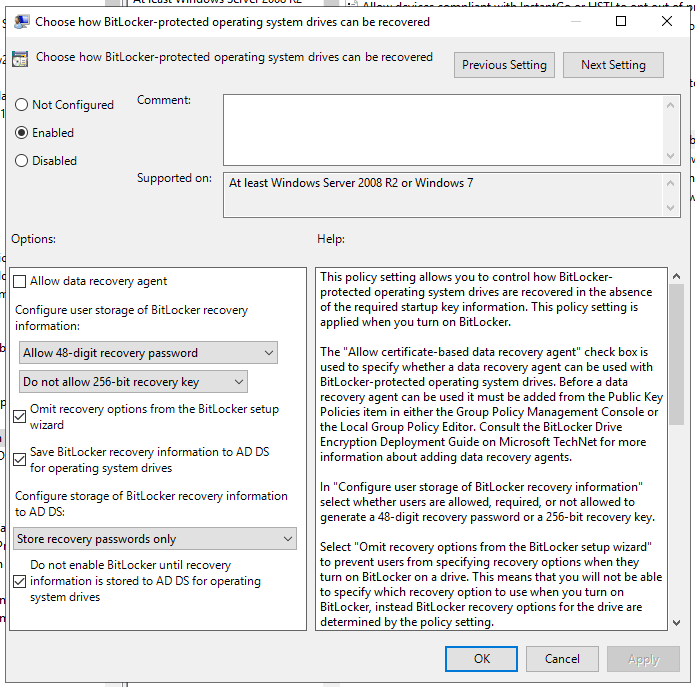
- Choose how Bitlocker-protected operating system drives can be recovered: This is where the magic happens. See the image below. We uncheck Allow Data Recovery Agent as we do not use them (More info on DRAs here). We Allow 48-Digit recovery password, and do not allow 256-bit recovery key. We really only want users (or techs) to punch in a password if things go sideways. We check Omit Recovery Options... as we don't want end users fiddling with anything. We check the Save Bitlocker Recovery Information to AD DS box, which does exactly what it says on the tin. For Configure Storage we set this to Store recovery passwords only, again somewhat self-explanatory. We also check the Do not enable bitlocker until revoer information is stored in AD DS box so that we don't end up with an encrypted device with no recovery key.
- Reset platform validation data after Bitlock Recovery: Bitlocker does some voodoo to validate that it's on the correct computer and nothing has been tampered with. On the rare occasion it spazzes, it will make you enter the recovery key. With this option enabled, whatever changed will become the "new normal" after you enter the recovery key. You probably want this enabled.
On the Workstation:
We have a script to run. First we need to make sure the GPO is applied to the workstations. Assuming you've applied the GPO to the correct OUs in the Group Policy Management Console, each workstation will need to be rebooted or have the gpupdate command run. The script itself will attempt to run a gpupdate before anything else, so this likely will not be an issue for most of you, but it is worth mentioning.
Deploying the Powershell script can be done a million different ways, including a scheduled task via GPO. It only needs to be run once on each workstation. I use PDQ Deploy. This is the script:
# Let's attempt a GPUpdate, just in case.
gpupdate /target:computer /force /wait:120
# Let's get the current Group Policy as applied
$gpresult = gpresult /r | Out-String
# Check for presence of the Bitlocker GPO
if ($gpresult -Like "*Settings - Enable Bitlocker*") {
    # Run the command to enable BitLocker
    Enable-Bitlocker -MountPoint C: -RecoveryPasswordProtector
}
What this script does, is first attempt to update the machine's group policy and pull a group policy report, then verify that there is a Bitlocker GPO being applied. We do NOT want to begin encryption unless the GPO has been applied, otherwise the encryption process will use default settings and (if it works at all) we won't have any copies of our recovery keys. Please bear in mind, this if() statement is literally just looking for the text Settings - Enable Bitlocker in a big block of text so change it to whatever you named your GPO (Don't remove the asterisks as they are wildcards). If the GPO is confirmed then we run the one-line command to begin encryption, and it will follow the rules in our GPO. This happens silently in the background.
Recovery:
If things go sideways on the workstation, you may see the screen in the image below. You'll need to dig up the recovery key to continue booting:
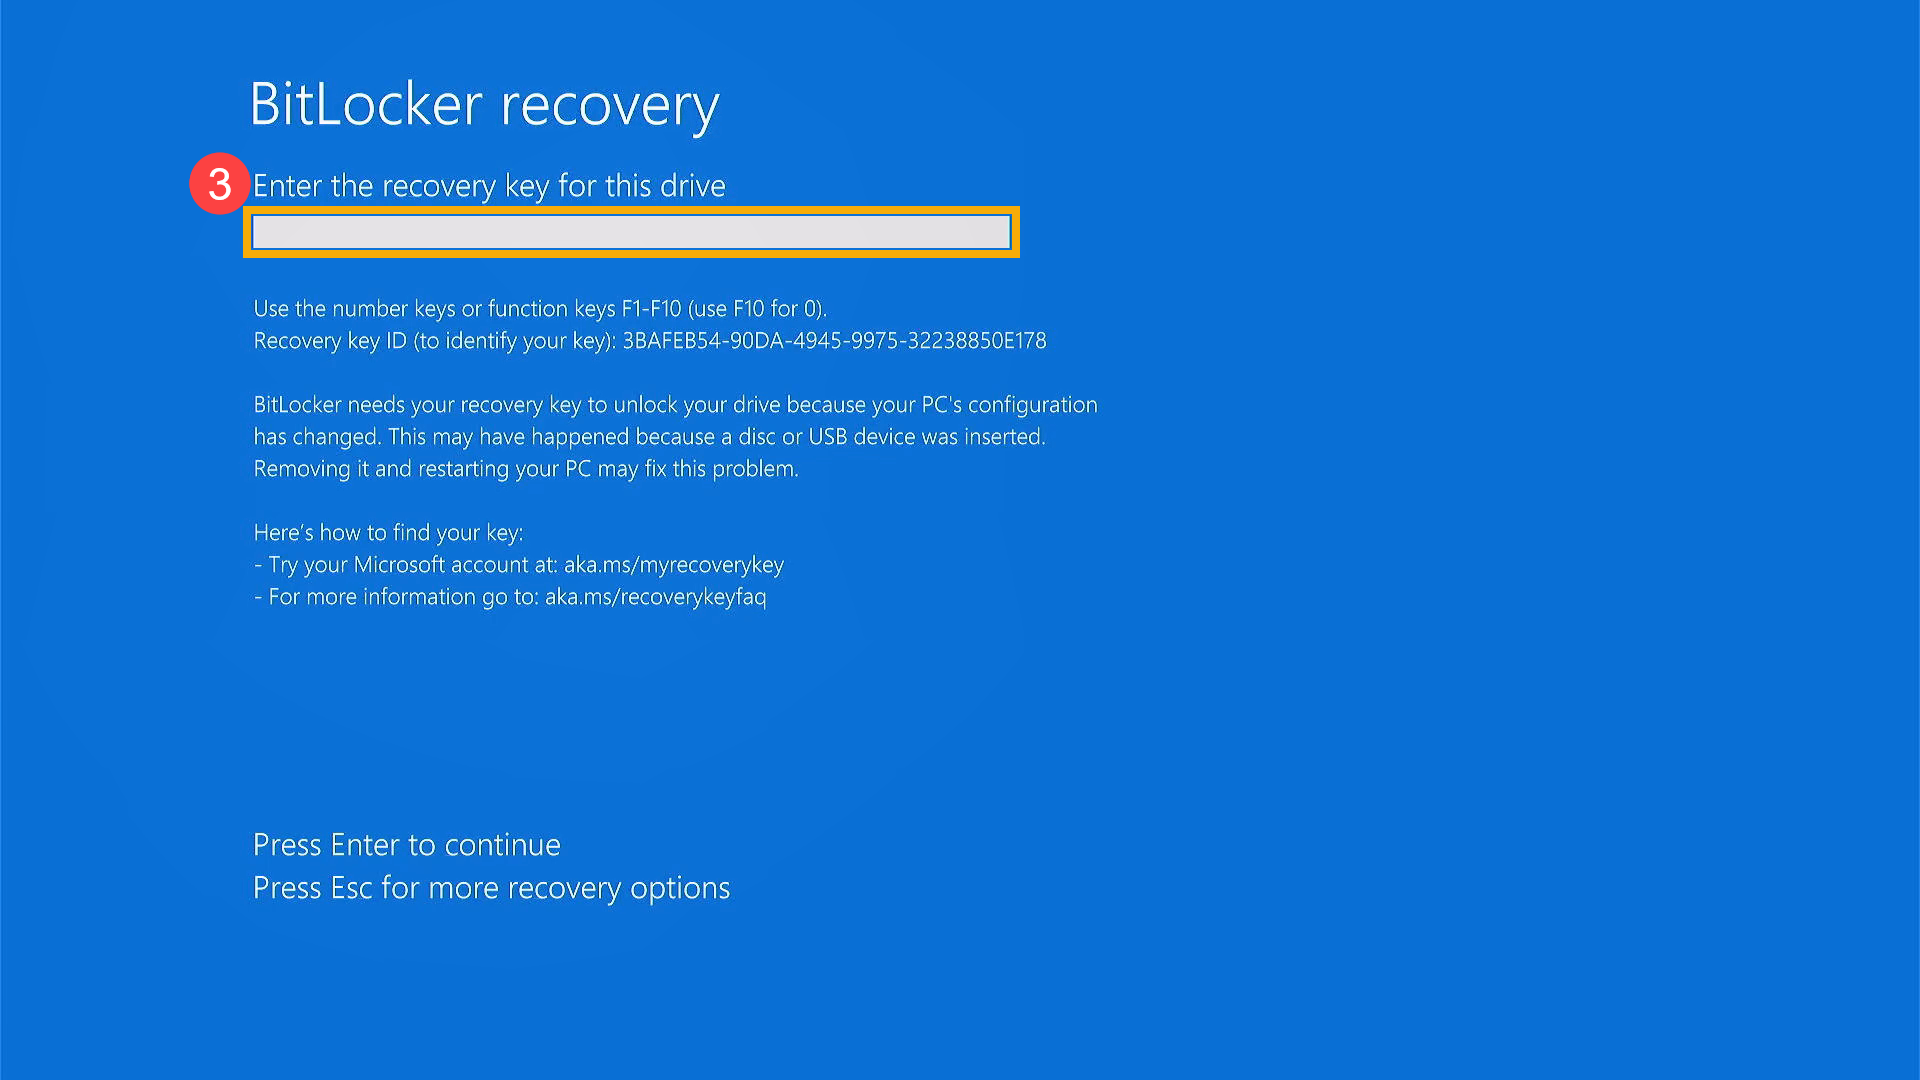
Luckily this is really easy. Open Active Directory Users and Computers on your Domain Controller (or wherever you have it set up) and find the Computer object you need the password for. Double-click (or right-click + Properties) and click the Bitlocker Recovery tab.

The Password ID is not the recovery password! (Common mistake) The recovery password is 48 numerical digits, it's down here in the section highlighted in red. Enter this on the Bitlocker recovery screen and you are good to go.


